|
Anyone following this series should by now have a small UWP up and running with the ability to add, remove and view data from a Firebase database. In this post I'm going to add the ability to update existing data in the database.
Small UI Changes Updating data is very similar to adding and deleting data, since the object data must be supplied and the object key so that the correct object is updated within the database. However, some UI changes must be made first since I have used TextBlock instead of TextBox for the Name and Rating fields in the HeroItem class. As a result, the data in these TextBlocks cannot be changed. In addition to this, these elements cannot be accessed from the event handlers in this class, so I will also set class variables for these elements. Here are the changed portions of HeroItem.cs: public class HeroItem : StackPanel { Hero hero; MainPage mainPage;
TextBox tbName; TextBox tbRating;
public HeroItem(Hero hero, MainPage mainPage) { // code omitted //
// add the name tbName = new TextBox(); tbName.Width = 100; tbName.Text = this.hero.Name;
// add the rating tbRating= new TextBox(); tbRating.Width = 25; tbRating.Text = this.hero.Rating.ToString();
// code omitted // } With the changes made to the Name and Rating elements, I'll now move over to HeroConn.cs and add the Update() method. HeroConn.cs Update() The code I have used for updating is almost a carbon copy of the code I have used for deleting. I first created the Update method in HeroConn.cs like so, passing in a Hero object: public async void Update(Hero hero) { await firebase.Child(node).Child(hero.Key).PutAsync<Hero>(hero); }
The only real difference to the Delete method, aside from the naming of course, is that the hero object must be passed in to the PutAsync<Hero>() method at the end.
HeroItem Update Button Event Handler
First, I added an event handler to the button 'btnUpdate' in HeroItem.cs and let Visual Studio create the handler for me. The code in the HeroItem constructor: // add the Update button Button btnUpdate = new Button(); btnUpdate.Content = "Update"; btnUpdate.Tapped += BtnUpdate_Tapped; And the new event handler: private void BtnUpdate_Tapped(object sender, Windows.UI.Xaml.Input.TappedRoutedEventArgs e) { HeroConn conn = new HeroConn(); this.hero.Name = this.tbName.Text; this.hero.Rating = Convert.ToInt32(this.tbRating.Text);
Task.Run(() => conn.Update(this.hero)).Wait(); this.mainPage.GetHeroes(); } This method is a little different to the Delete event handler. In this one, I took the current values from the related TextBoxes and assigned them to the relevant properties of the Hero class variable, hero. This object with the new values is then passed to the HeroConn Update() method and finally the UI is updated as before. Now test and run the application again, try to edit the data for a hero in the list and then click the Update button beside that hero. Note: I noticed at this point that the tbName field was too narrow for some of the names I was storing and displaying, so I changed its width in the HeroItem constructor to 150. As I have stated repeatedly in these posts, I am not focusing on creating a nice UI but only on implementing the basic CRUD functionality. As always, if you have the Firebase Console page open, you should see the record turn yellow and the new data added, like in the image below: 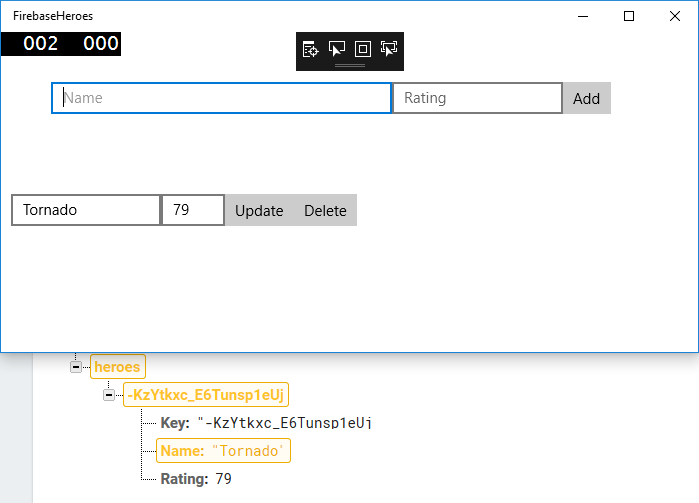
That's it for this post and for the bones of this application, basic and all as it is. I haven't yet decided what to do in the following post but it should be up in the next number of days.
In this post, I am going to implement deleting data from the Firebase database. This will be a relatively short post since it's so simple!
In a nutshell, there are two options for creating the HeroConn Delete() method. I could:
The Delete() method First, I'll create the Delete() method in HeroConn.cs: public async Task Delete(Hero hero) { await firebase.Child(node).Child(hero.Key).DeleteAsync(); }
This is so very straightfoward but I'll talk about it very briefly. Using the same node as always ('heroes/'), then get the child of that node using the Key value - this is the unique identifier of the object in the database as I have mentioned before. On the child, perform the DeleteAsync() method and voila.
Note: To use this correctly, i.e. Child().Child() , you must have the following using statement at the top of HeroConn.cs: using Firebase.Database.Query;
This can be quite confusing if you receive errors and has caught me out in the past.
With the method created, it's time to implement it in the UI. Because the Delete button is part of the HeroItem class and I want to update the UI after the event, I am going to need a reference to the Main Page to call the GetHeroes() method. I am going to do this the simplest way possible - by passing a reference to the Main Page into the HeroItem constructor...
Changing the HeroItem constructor Passing a reference to the constructor is not enough, I also need to set a class variable to be able to access this reference from the event handler, like so: public class HeroItem : StackPanel { Hero hero; MainPage mainPage;
public HeroItem(Hero hero, MainPage mainPage) { this.hero = hero; this.mainPage = mainPage; // code omitted } }
Notice that I have omitted the rest of the code for the HeroItem class to save on space.
Now, anywhere I have created a HeroItem object, I need to ensure that the reference is passed in. Luckily, this is only one line of code in the foreach loop in the GetHeroes() method in MainPage.xaml.cs: foreach (Hero h in heroList) { this.spHeroList.Children.Add(new HeroItem(h, this)); }
Simple, pass the reference to the Main Page object (this) in to HeroItem constructor. Note: the GetHeroes() method signature should also be changed to public so it accessible from the HeroItems.
Delete Button Event Handler An event handler needs to be created for the Delete button and Visual Studio makes this very easy. After the btnDelete.Content line in the HeroItem class, simply type btnDelete.Tapped+= and then press the Tab key. Visual Studio will create and assign the handler to the button. The code for the button in the HeroItem constructor now looks like this: // add the Delete button Button btnDelete = new Button(); btnDelete.Content = "Delete"; btnDelete.Tapped += BtnDelete_Tapped; Inside the event handler, create a new connection, call the connection's Delete method and then update the UI once the object is deleted by calling mainPage.GetHeroes(). The final method should look like this: private void BtnDelete_Tapped(object sender, Windows.UI.Xaml.Input.TappedRoutedEventArgs e) { HeroConn conn = new HeroConn(); Task.Run(() => conn.Delete(this.hero)).Wait(); this.mainPage.GetHeroes(); } Now, run and test that the application is running. Of course, you should have some Heroes in the database - if not, add some first. Clicking the Delete button beside any Hero in the list should now remove that Hero from the database and consequently, the list. If you have the Firebase console open, you should see the record first turn red and then disappear from the database, like in the image below: 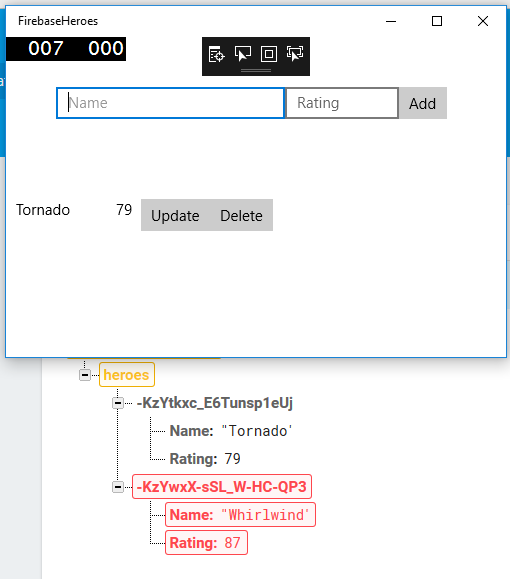
Once again, it's not very pretty but it works! In the next post, I'll look at updating the database data.
If you've been following this series of posts, you'll know that in the last post I set up the UI for reading the Firebase data and used some dummy Hero objects to simulate database records. In this post, I am going to implement reading the records from the database.
As I have no experience of reactive observables in C#, I am going to do this in a slightly odd way. I would love to get some feedback on this and some tips or an example of using observables correctly in this context.
Adding the Get() method to HeroConn.cs
Open up HeroConn.cs and add a new method Get(). This method will again return an async Task and has no parameters since it is retrieving all of the database records.
As I mentioned above, I am not very familiar with reactive observables in C#, so I am simply going to manipulate a static list of Heroes in MainPage.xaml.cs. This list will be cleared and repopulated each time data is retrieved from the database. Let's first take a look at the HeroConn.cs Get() method: // retrieve the database records and add a new Hero object to // heroList on MainPage.xaml.cs for each object public async Task Get() { var results = await firebase.Child(node).OnceAsync<Hero>(); MainPage.heroList = new List<Hero>(); foreach (var item in results) { MainPage.heroList.Add(new Hero { Key = item.Key, Name = item.Object.Name, Rating = Convert.ToInt32(item.Object.Rating) }); } }
This code is again quite straightforward thanks to FirebaseDatabase.net. First I call the OnceAsync method and store its results in a 'results' variable. This is the only change needed in HeroConn.cs. Looping through the results, I then add a new Hero object for each result.
Notice here that I am first setting the Key value by accessing item.Key, while the actual Hero properties are accessed by item.Object.Name and item.Object.Rating. Now, in MainPage.xaml.cs I have called this method from the GetHeroes() method, which I have also used to reinitialise the heroList and update the spHeroList StackPanel each time the database is read from. The reason for initiliasing an empty list each time should be clear - there would be duplicates in the list. The code to update the StackPanel (spHeroList) is taken from the old AddHeroes() method which I have removed completely. In the MainPage.xaml.cs constructor, I have called the GetHeroes() method after the component has been initialised. I have also called the method in the btnAdd_Tapped event handler so that each time a new Hero is added to the database, a database read is performed and the UI is updated accordingly. MainPage.xaml.cs should now look like this: namespace FirebaseHeroes { public sealed partial class MainPage : Page { public static List<Hero> heroList;
public MainPage() { this.InitializeComponent(); // get data and update UI GetHeroes(); }
// call the HeroConn method, populate heroList and also update the UI private void GetHeroes() { // create a new List heroList = new List<Hero>(); // and a new connection HeroConn conn = new HeroConn(); // get the data and add it to the heroList Task.Run(() => conn.Get()).Wait();
// clear all HeroItems from the StackPanel this.spHeroList.Children.Clear(); // and add new ones foreach (Hero h in heroList) { this.spHeroList.Children.Add(new HeroItem(h)); } }
private async void btnAdd_Tapped(object sender, TappedRoutedEventArgs e) { HeroConn heroConn = new HeroConn(); Hero hero = new Hero { Name = this.tbInputName.Text, Rating = Convert.ToInt32(this.tbInputRating.Text) }; await heroConn.Insert(hero); this.tbOutput.Text = String.Format("Hero {0} added!", hero.Name);
// get new data and update UI GetHeroes(); } } }
Now run the program and any objects in the database should be displayed in the UI.
Adding a new Hero via the application input area should result in the new Hero also being displayed in the list. That's all for now.
In the last post, I finally got around to inserting some data with the application. In this post, I am going to read a list of all the item from the database.
There are better ways to implement what I am going to do, namely through the use of Observables, but I am going to keep this simple, as I have throughout the series. I'm going to first make some changes to the UI, in particular I'm going to add a new vertical StackPanel element beneath the gridInput element. I'm going to name this new StackPanel 'spHeroList'. Each Hero object will be added to this StackPanel in code. The main Grid, gridRoot in MainPage.xaml now looks like this: <Grid x:Name="gridRoot" Background="{ThemeResource ApplicationPageBackgroundThemeBrush}"> <StackPanel Orientation="Vertical"> <Grid x:Name="gridInput" Margin="50"> <Grid.ColumnDefinitions> <ColumnDefinition Width="4*"/> <ColumnDefinition Width="2*"/> <ColumnDefinition Width="1*"/> </Grid.ColumnDefinitions> <Grid.RowDefinitions> <RowDefinition Height="1*"/> <RowDefinition Height="1*"/> </Grid.RowDefinitions> <TextBox x:Name="tbInputName" PlaceholderText="Name" Grid.Column="0"/> <TextBox x:Name="tbInputRating" PlaceholderText="Rating" Grid.Column="1" InputScope="Number"/> <Button x:Name="btnAdd" Grid.Column="2" Content="Add" Tapped="btnAdd_Tapped"/> <TextBlock x:Name="tbOutput" Grid.Row="1" Grid.ColumnSpan="3" HorizontalAlignment="Center"/> </Grid> <StackPanel x:Name="spHeroList" Orientation="Vertical"> </StackPanel> </StackPanel> </Grid>
Create a Dummy List of Heroes to Display
Before reading anything from the database, I'm going to create a list of 3 Heroes in code and try to add them dynamically to the StackPanel. Each Hero will be placed in its own StackPanel element and I'm going to create a dedicated class for this - HeroItem, which extends StackPanel. Each Hero is (hopefully) going to appear in a similar fashion to the input area, only in a horizontal stack panel. I will also add two buttons - Update and Delete, although I will not code these just yet.
Create a new class in the root of the project and name it 'HeroItem.cs'. Here is the code I have used in the class: namespace FirebaseHeroes { public class HeroItem : StackPanel { Hero hero;
public HeroItem(Hero hero) { this.hero = hero; // some layout options for the HeroItem this.Orientation = Orientation.Horizontal; this.Padding = new Thickness(10);
// add the name TextBlock tbName = new TextBlock(); tbName.Width = 100; tbName.Text = this.hero.Name;
// add the rating TextBlock tbRating= new TextBlock(); tbRating.Width = 25; tbRating.Text = this.hero.Rating.ToString();
// add the Update button Button btnUpdate = new Button(); btnUpdate.Content = "Update";
// add the Delete button Button btnDelete = new Button(); btnDelete.Content = "Delete";
// add the elements to this stackpanel this.Children.Add(tbName); this.Children.Add(tbRating); this.Children.Add(btnUpdate); this.Children.Add(btnDelete);
} } }
In brief, this is a class that extends the StackPanel class, so it inherits all properties of a StackPanel element. I have added a Hero property to the class which is assigned in its constructor. All of the work is done in the constructor:
namespace FirebaseHeroes { public sealed partial class MainPage : Page { private List<Hero> heroList;
public MainPage() { this.InitializeComponent(); GetHeroes(); AddHeroes(); }
private void GetHeroes() { this.heroList = new List<Hero>(); Hero heroOne = new Hero { Name = "Bombasto", Rating = 86 }; Hero heroTwo = new Hero { Name = "Magma", Rating = 83 }; Hero heroThree = new Hero { Name = "Tornado", Rating = 96 }; this.heroList.Add(heroOne); this.heroList.Add(heroTwo); this.heroList.Add(heroThree); }
private void AddHeroes() { foreach(Hero h in heroList) { this.spHeroList.Children.Add(new HeroItem(h)); } }
private async void btnAdd_Tapped(object sender, TappedRoutedEventArgs e) { HeroConn heroConn = new HeroConn(); Hero hero = new Hero { Name = this.tbInputName.Text, Rating = Convert.ToInt32(this.tbInputRating.Text) }; await heroConn.Insert(hero);
this.tbOutput.Text = String.Format("Hero {0} added!", hero.Name); } } } I first added a class variable heroList which is a List of type Hero. This will be used to hold all of the Hero items which will be displayed in the interface. I have used the GetHeroes() method to populate this List with some dummy data - 3 Hero objects. In the AddHeroes() method, a HeroItem is added to spHeroList for each of the Hero objects contained in the heroList. Both of these new methods are called within the MainPage constructor, after the InitializeComponent() method is called - very important! Running the program now should result in something similar to the image below: 
No, it's not pretty, but yes, it does work!
More next time when I'll be reading the contents of the database into the UI.
In the last posts, we have set up everything needed to connect to Firebase in C#. Let's finally connect.
Open up HeroConn.cs and start coding. I'll paste the code here first and then talk through what is happening: using System; using System.Threading.Tasks; using Firebase.Database;
namespace FirebaseHeroes.Data { public class HeroConn { private const String databaseUrl = "https://tour-of-heroes-xxx.firebaseio.com/"; private const String databaseSecret = "your-unique-database-secret"; private const String node = "heroes/";
private FirebaseClient firebase;
public HeroConn() { this.firebase = new FirebaseClient( databaseUrl, new FirebaseOptions { AuthTokenAsyncFactory = () => Task.FromResult(databaseSecret) }); }
public async Task Insert(Hero hero) { await firebase.Child(node).PostAsync<Hero>(hero); } } } First I created a String 'node'. This represents the hero part of the database, accessed through the databaseUrl + 'heroes/'. As this class is specifically dealing with Hero objects, this is set as a constant. I then created a variable 'firebase' of type FirebaseClient which is the actual connection to Firebase. This variable is initialised in the constructor by passing both the databaseUrl and the databaseSecret key to the FirebaseClient constructor. This piece of code could actually be broken out into its own class and reused for other Firebase objects and database operations. The Insert() method deals with, you guessed it, inserting a Hero object into the Firebase database. This method is async as the FirebaseClient method is PostAsync. Note how the method also takes in the 'node' variable to access the heroes section of the database and the actual Hero object (hero) which will be added to the database. It really is that easy!
Connecting the Interface
With the connection and Insert() method created, I'm going to go back to the btnAdd_Tapped() method in MainPage.xaml.cs
This method needs to be altered to call the Insert() method from HeroConn. Again, this is not hard to do. Remembering that the Insert method has a Hero object as a parameter, a Hero object will first be created from the form data and then passed to the Insert method. I am not going to perform any validation of the text fields in the UI as this is out of scope for these posts. Note: As the rating field is an int, an exception will be thrown if anything else is entered in to the Rating text box and the button is clicked. Here is the finished MainPage.xaml.cs code: namespace FirebaseHeroes { public sealed partial class MainPage : Page { public MainPage() { this.InitializeComponent(); }
private async void btnAdd_Tapped(object sender, TappedRoutedEventArgs e) { HeroConn heroConn = new HeroConn(); Hero hero = new Hero { Name = this.tbInputName.Text, Rating = Convert.ToInt32(this.tbInputRating.Text) }; await heroConn.Insert(hero);
this.tbOutput.Text = String.Format("Hero {0} added!", hero.Name); } } }
Note that the btnAdd_Tapped handler method has also been marked async since the HeroConn Insert() method is async.
The Convert.ToInt32 method may throw and exception as I stated above. After the insert has completed, a message will be displayed in the tbOutput TextBlock.
Run and Test
The application should now have the ability to insert data into the Firebase database so let's test and see.
First of all, open up the Firebase console for the tour-of-heroes project - it will be something like https://tour-of-heroes-xxxxx.firebaseio.com/heroes and you will need to be logged in to your Google account of course. Now run the application and keep the Firebase console window open alongside. Try to add a Hero by entering some text in the Name field and a number in the Rating field and clicking the Add button. You should see the record being created in the Firebase console with the same data you just entered, success! Note the Key value that Firebase automatically added to the record. This is the unique identifier for that record in the database and can be used in future to get that specific record from the database - much like a primary key in a standard RDMS. The image below shows this. 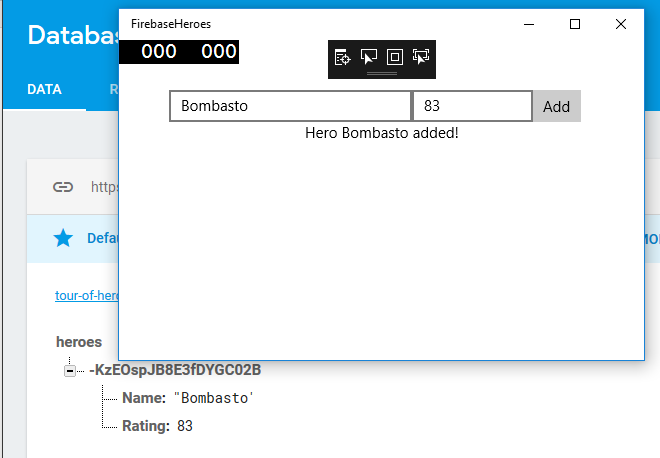
If you view these windows at the same time, you will see how quickly the data is added to Firebase. You will also notice that Firebase has colour coded highlighting for a record when an operation is being performed on it: Green for Insert, Orange for Update and Red for Delete - more on these in a later post!
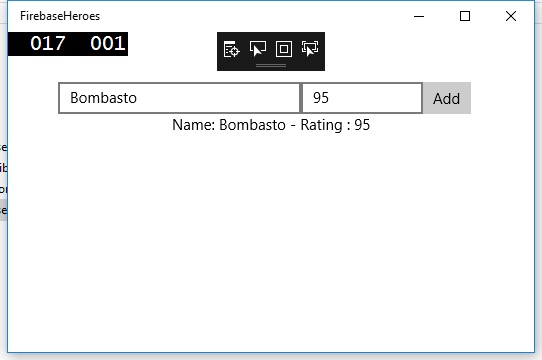
In the last post, I created a small UWP application in Visual Studio and added a small interface and a data model. The application and interface was very basic and simply populated a label with the text from two TextBox elements. At this point, it should look something like the image below...
FirebaseDatabase.net
The next step in my application is to add the Firebase connection and for that, I need to first add the FirebaseDatabase.net package - https://github.com/step-up-labs/firebase-database-dotnet
In the solution explorer, right-click on the FirebaseHeroes project (not the solution) and select “Manage NuGet packages…”. The package manager tab should open up. In this tab, click ‘Browse’ and type “firebase.database” (don’t forget the dot) and hit Enter. The top result should be Firebase.Database Version 1.0.0 by Step Up Labs Inc. Click Install, confirm the installation, accept the terms and wait for the operation to complete. It shouldn’t take very long. You can now close the NuGet tab. Note: A newer version may be available but for the purpose of this blog I am using v1.0.0. This version can be selected in the right-hand pane in Nuget Package Manager.
Looking at the FirebaseDatabase.net page at https://github.com/step-up-labs/firebase-database-dotnet gives a pretty good idea of what needs to be done, however, there is a caveat – authentication
Firebase Authentication and Credentials
While setting up the Firebase database, you may have noticed the “Default security rules require users to be authenticated” message. It is, of course, possible to set Firebase’s security to allow everybody to view the database, but that doesn’t like a good idea for a lot of applications, does it? The FirebaseDatabase.net page also mentions this: “For Authenticating with Firebase checkout the Firebase Authentication library and related blog post”.
So, another package is required? Let’s not do that. There is a simple authentication method which can be used so I’m going to take the easy option here. If per-user authentication was going to be used within this application, the extra package would be necessary, but at the moment I just want to authenticate the application/client with Firebase.
Create a HeroConn class
Because this is a very basic application for demo purposes, I'm just going to create a single class to deal with the database connection and operations.
In the Data folder in the project, add a new class HeroConn.cs and make it public. In that class, create two private string constants - databaseUrl and databaseSecret, and just initialise them empty strings for now, as below: namespace FirebaseHeroes.Data { public class HeroConn { private const String databaseUrl = ""; private const String databaseSecret = ""; } }
Get The Credentials
In a nutshell, for basic database authentication, Firebase requires two pieces of information:
The DatabaseUrl is the easiest of the two to find. Simply click on the Database button in the sidebar of your project console and it will be displayed just above your data. It will look something like this : https://tour-of-heroes-2bde9.firebaseio.com/ (ensure there is nothing after the final slash, which means that you are at the root node). Copy/paste this URL into the databaseUrl string in HeroConn.cs. Beside the Overview button, there is a gear wheel icon. Click it and then click Project Settings. In the new page, click the Service Accounts tab and then Database Secrets. There should be one database and secret in the list, click the Show button to unmask the database secret and copy/paste it into the databaseSecret string in HeroConn.cs. With this done, we are now ready to connect to the database in the next blog post, where we will create the connection and a method to insert data to the database. |
Author
2nd Year B.Sc. Software Development Archives
December 2017
Categories |
 RSS Feed
