|
In my last blog post, I created a Firebase database from the Firebase console and left it at that. In this post, I am going to set up a small UWP (Universal WIndows Platform) application which I will use to connect to that database. In the following posts, I will add to this more functionality to this application and by the end of this short series, we will have an application which can write data to and read data from Firebase.
One thing I have noticed that may be confusing to some readers is that since I wrote my last blog post, the layout of the Firebase site has changed somewhat. I will add a post that will reiterate the information in the last post with updated screenshots and I will link each post together to limit any confusion which anyone may have. I have one and only one objective in this particular post - set up a small UWP app and prepare it for use with Firebase.
Firebase Database.net
As I mentioned in my earlier posts, Firebase offers guidance in connecting to it programmatically from a number of different frameworks and languages, C# however, is not one of those. In this case, I am going to use a 3rd party library called Firebase Database.net to connect to and easily add the data to Firebase. I will add this package to the project in the next post. Firebase Database.net is an open source project by step-up-labs which provides a simple wrapper on top of the Firebase Realtime Database REST API and it works great - https://github.com/step-up-labs/firebase-database-dotnet
Creating the Project in Visual Studio 2015
Open up Visual Studio 2015 (VS) and create a new project. From the templates, select Visual C# -> Windows -> Universal and then Blank App in the list of available templates. I named the project FirebaseHeroes. In the popup window, I used the selected defaults of Target Version Build 14393 and Minimum Version Build 10586.
Creating a Data Model
The application will be used to add data to Firebase but what type of data? I'm a big fan of the Angular web framework so I'm going to base this application around the Angular Tour of Heroes tutorial. I'll talk about this in a future post hopefully, but for now I'll just take a look at the very simple data that is used in the tutorial - a Hero with an ID and a Name. ID is usually a good field to have on any database object, but I'm going to change this and use a Rating field instead. This will be fine for the purposes of my application. Let's now make a data model to represent this data. Right-click the FirebaseHeroes project in Visual Studio and add a new folder named 'Data'. In this folder, add a new class and name it Hero. Make the class public and add some properties with getters and setters to it: Key, Rating and Name, as shown in the code below: public class Hero { public string Key { get; set; } public int Rating { get; set; } public string Name { get; set; } }
I have not mentioned the Key field yet but this is important for Firebase as it is the unique identifier for the object in the Firebase database and is added to every record inserted into a Firebase database. More on this later.
Adding a Data Entry Area The first thing I want to be able to do with this application is to add some data to Firebase, data which will be input in a textbox on the main page of the application. First I'll create a simple layout in XAML and add the relevant elements to it. I'm going to keep it very simple (and ugly) to begin with as this is a prototype. After opening MainPage.xaml, I gave the existing Grid object a name, i.e. x:Name="gridRoot". I then added the needed elements to a Grid within a vertical StackPanel. This is a quick and dirty UI setup and I will change it later as needed. There are great resources and tutorials for working with XAML on MSDN and this is out of scope for my posts so I will not elaborate on any of the elements too much. For now, it contains everything needed, including an output area which is populated when the Add button is clicked. This is achieved using the event handler 'btnAdd_Tapped' which is attached to the Button. Visual Studio prompts to add this handler automatically to the MainPage.xaml.cs file if needed and this is usually a good idea. The resulting MainPage.xaml now looks like this: <Page x:Class="FirebaseHeroes.MainPage" xmlns="http://schemas.microsoft.com/winfx/2006/xaml/presentation" xmlns:x="http://schemas.microsoft.com/winfx/2006/xaml" xmlns:local="using:FirebaseHeroes" xmlns:d="http://schemas.microsoft.com/expression/blend/2008" xmlns:mc="http://schemas.openxmlformats.org/markup-compatibility/2006" mc:Ignorable="d">
<Grid x:Name="gridRoot" Background="{ThemeResource ApplicationPageBackgroundThemeBrush}"> <StackPanel Orientation="Vertical"> <Grid x:Name="gridInput" Margin="50"> <Grid.ColumnDefinitions> <ColumnDefinition Width="4*"/> <ColumnDefinition Width="2*"/> <ColumnDefinition Width="1*"/> </Grid.ColumnDefinitions> <Grid.RowDefinitions> <RowDefinition Height="1*"/> <RowDefinition Height="1*"/> </Grid.RowDefinitions> <TextBox x:Name="tbInputName" PlaceholderText="Name" Grid.Column="0"/> <TextBox x:Name="tbInputRating" PlaceholderText="Rating" Grid.Column="1" InputScope="Number"/> <Button x:Name="btnAdd" Grid.Column="2" Content="Add" Tapped="btnAdd_Tapped"/> <TextBlock x:Name="tbOutput" Grid.Row="1" Grid.ColumnSpan="3" HorizontalAlignment="Center"/> </Grid> </StackPanel> </Grid> </Page> And MainPage.xaml.cs now looks like this with the event handler, which I have added some code to so that the tbOutput text box will be populated when the button is clicked: public sealed partial class MainPage : Page { public MainPage() { this.InitializeComponent(); }
private void btnAdd_Tapped(object sender, TappedRoutedEventArgs e) { this.tbOutput.Text = "Name: " + this.tbInputName.Text +" - Rating : " + this.tbInputRating.Text ; } }
Run The Project and Test
Now that the basic input is set up, try it out by running the project. The Main Page should open with both of the texboxes and the button visible. Enter something into each textbox and click the Add button and the text should be displayed in the output textblock. That is all that I am going to cover in this post but in the next post, hopefully, I will get to cover adding some data in to Firebase using this very simple UI.
1 Comment
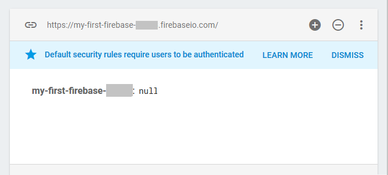
In my last post, I wrote about Google's Firebase services, in particular the realtime database service. In this post, I'll be going through the process of creating a Firebase database which I will be populating with some existing JSON data in the next post. In a future post (or posts), I will then be querying this database from a small C# application to simply list all of the data in the database in a console window. Once this application is working, the fundamentals for connecting to Firebase should become clear and the bulk of the code in the C# application can be re-used in future C# applications, e.g. in a UWP or Web API project. To begin with, a Google account is essential to avail of the Firebase services. Once logged in to a Google account in your browser, navigate to firebase.google.com/. This link will bring you to the main Firebase portal and from here you can access your own personal Firebase console by clicking the GO TO CONSOLE button in the top right of the page, as shown in the image below. 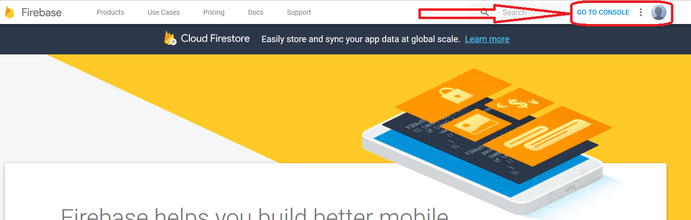 Firebase Main Portal If this is your first time accessing Firebase, you may be required to accept the term and conditions for usage of the services. Once at the console, you will be presented with a page similar to the one in the image below. 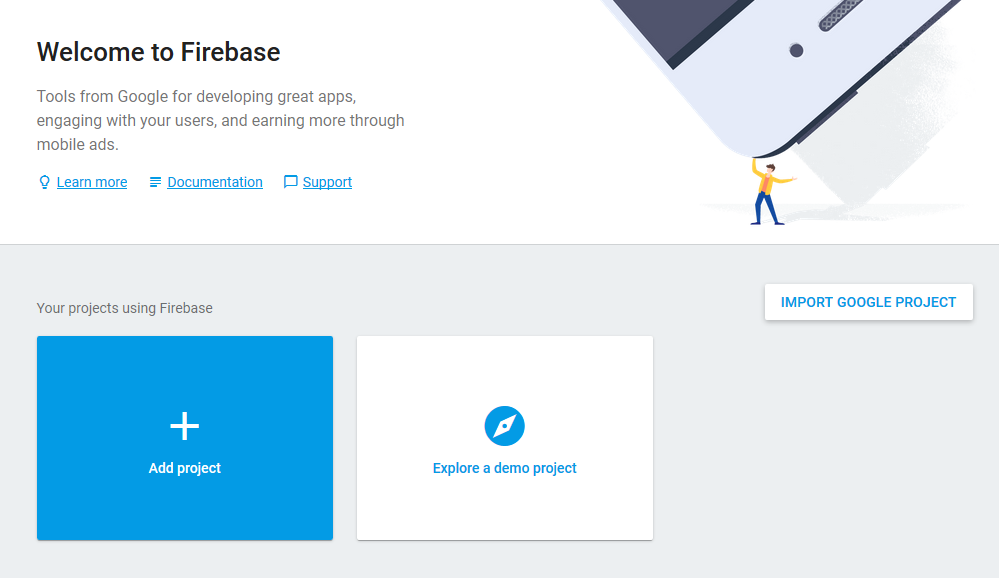 Firebase Main Console Once at the console, a project must be created before you can begin using the Firebase services. This is fairly self explanatory, so just click Add Project and a popup will be displayed asking for a project name and the country or region in which you are based. 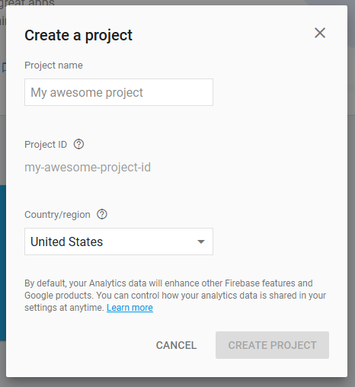 The Create Project Popup The Create Project Popup Enter a sensible project name here. For the purposes of this post, I am going to use 'my-first-firebase' and select Ireland as the country. 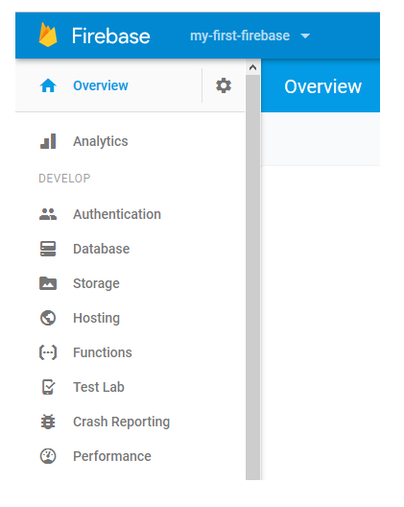 You will now be brought to the actual console for this project, which can be seen in the image on the right. There are a number of options in the left hand sidebar and the one we are interested in is the Database one. Click on the Database option and when given the option between Realtime Database or Cloud Firestore, click Get Started under Realtime Database, show in the image below. Your database will now be created and you will be shown the current state of the database, along with the database unique URL and name. I have masked the unique ID of the database in the last image which is probably not necessary, but it can be seen that the database is empty (null) and ready to be used.
In the next post, I will be populating this database with some existing JSON data which I have used in a small personal project. The data contains a number of fields per record but it is of a flat structure with no relations. The data also contains an imgur link for each image and I may use this in future if I have the time to create a webapp which also connects to this Firebase data.
Hopefully in the next few posts I will be connecting to this database with a C# console application, querying all of the records from the database and listing each record and its fields in the console.  Images taken from firebase.google.com/ Google's Firebase service at firebase.google.com/ allows application developers to quickly and easily integrate a data service into their apps without worrying about managing any of the infrastructure involved with traditional solutions such as MySQL database servers and a related backend solution.
Firebase makes this a breeze by providing a simple and easy to use way of managing your data from its cloud service. Connecting to this data is also made quite simple by the easy to follow setup guides for a number of common uses: webapps, Android apps and iOS apps. While these are the main platforms intended for use with Firebase, it is possible to connect other languages but a little more knowledge may be required on the part of the developer. Firebase is not only a database solution, it also offers services such as authentication, analytics, file storage, predictive technology, advertising, cloud messaging and more. In the context of this series of posts, however, I will be focusing on the database service and may touch on the authentication service briefly. Google offers Firebase as a three tiered service - a free plan called Spark, a fixed price plan called Flame and a pay as you go plan called Blaze. Comparing the plans, there is good value offered but I will be focusing on the free plan since most developers will, of course, be testing the services offered before committing to any expense. The free Spark plan is available to anyone with Google account and it offers a generous 10GB/month of data transfer along with 1GB of storage and 100 simultaneous connections. This would be plenty of data for a small, well designed application with a modest user base. Of course, if your app becomes successful enough and you need to support up to 100,000 connections , the $25/month upgrade to the Flame plan may not be too much of an issue. If your needs exceed this, the pay as you go Blaze plan may also be required but at this point, it may be worth considering different options from other providers for certain services, or even a custom backend solution. While the storage is generally quite small, a well developed app would not need such storage and it is always worth looking at other options. For example, if you need to store a lot of images, it may be worth thinking about storing and retrieving these images from another provider. In the case of a non-critical, personal or fun application, imgur.com may be enough for your needs, although reliability may be an issue from time to time. In the next post in this series, I will be looking at actually getting access to Firebase from a Google account and then creating a small database from some existing JSON data. |
Author
2nd Year B.Sc. Software Development Archives
December 2017
Categories |
 RSS Feed
